P1: IR camera
Devices used
- Adafruit AMG8833 IR Thermal Camera https://www.adafruit.com/product/3538
- FLIR Lepton 2.5 with breakout board https://groupgets.com/manufacturers/flir/products/radiometric-lepton-2-5
- Raspberry Pi 4 Model B
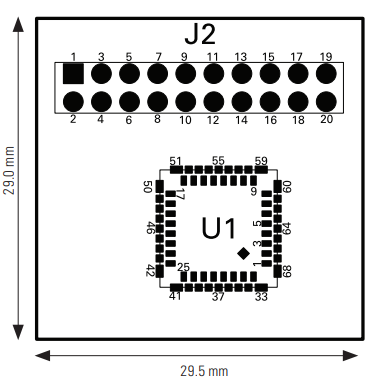
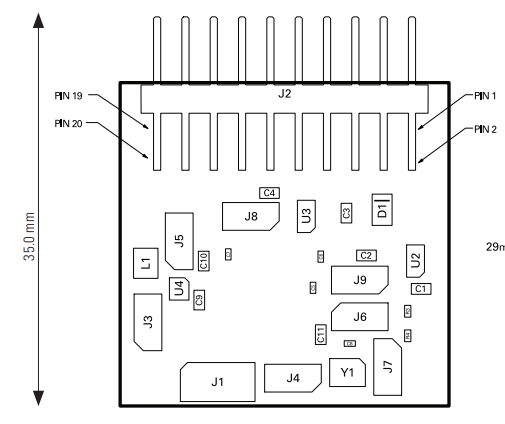
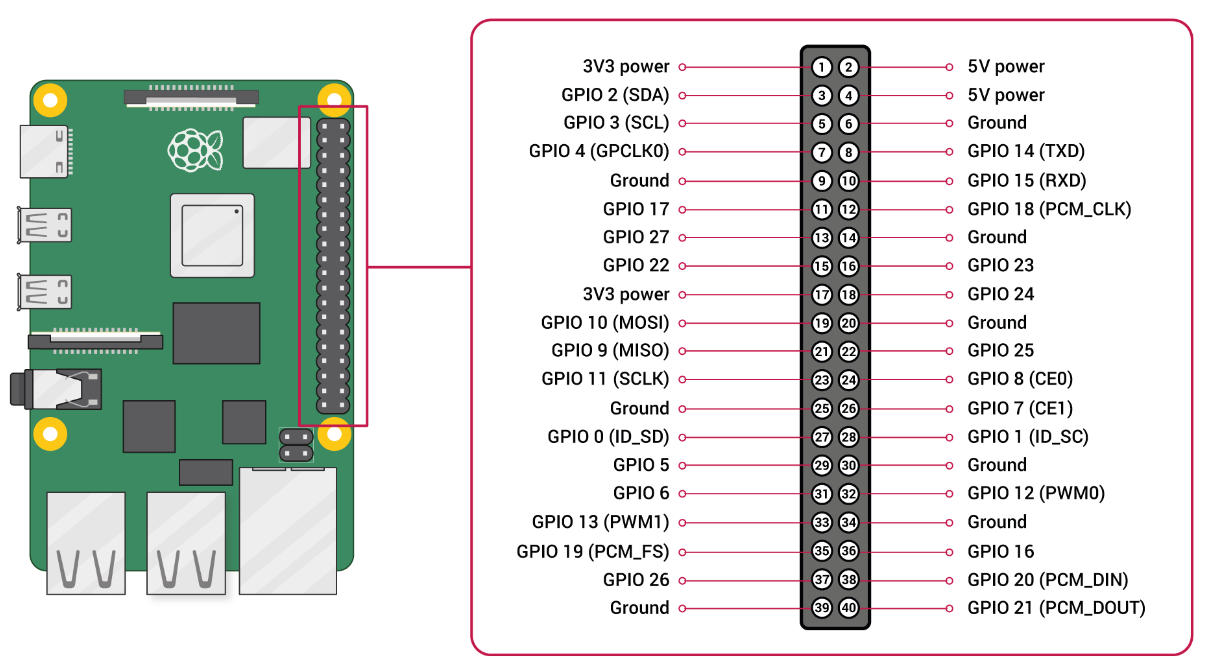
Pinout
Overall approach
The general approach selected was to build a server-side device which will continuously stream data to any client connected to it. Communication interface doesn't really matter, it can be Bluetooth/Wi-Fi/USB. Ideally, higher bandwidth with no physical connection is preferred, thus first we started with Bluetooth.
Client-side device of selection was Android, and we utilized sample Android code to initiate communication between device and server.
1. First prototype
Server-side
Used the following code as a basis to display thermal image (also attached below as agm_display.py): https://learn.adafruit.com/adafruit-amg8833-8x8-thermal-camera-sensor/raspberry-pi-thermal-camera
After that, created a Bluetooth server which uses sockets to send data to connected client. Application continuously listens for a server socket for incoming connections, starts sending data in a form of string (separated by "|") of 64 temperature values to the client. For Bluetooth connection, pybluez Python library is used.
1.1. Client-side
We did not finish the Android application. The current version simply shows the received message as logs. In general, the application maintains a Bluetooth connection to the server socket using MAC address and then continuously accepts data as a formatted string.
1.2. Troubleshooting
Sometimes, Bluetooth doesn't work, which was solved by executing the following commands on Raspberry Pi
$ sudo sdptool add SP         # There can be channel specified one of 79 channels by adding `--channel N`.
$ sudo sdptool browse local   # Check on which channel RFCOMM will be operating, to select in next step.
2. Second prototype
2.1. Sensor and connection to Raspberry Pi
For the second prototype, we started with another sensor - FLIR Lepton 2.5. It has much better resolution (80x60 pixels), which is definitely better than that of AMG8833.
We have sensor itself and breakout board, which we connected the sensor to. It has 16 pins and can use SPI/I2C connection interface. In this prototype, we connected it to Raspberry Pi using SPI interface. We followed the following instructions and connected breakout board to RPi: https://lepton.flir.com/getting-started/raspberry-pi-lepton/
2.2. Getting temperature data
Since we are using Raspberry Pi, it would be more convenient to code in Python. We were lucky that there exists a Python library which provides an interface to FLIR Lepton boards. The library is called PyLepton, and is really simple to use (https://github.com/groupgets/pylepton). We just have to install it from source (using pip) and then can access data from sensor using just one function call. The data is actually sent at frequency of 27 Hz, but unique frames are being sent at 9 Hz. The call to capture() function returns a frame (as Numpy array) and a unique frame ID (which is currently just a sum of all pixel values).
Note: the values returned from capture() function are given in centikelvin scale, i.e. they are temperature values in Kelvin*100. It is trivial to obtain Celsius values.
2.3. Communication between server and client
This time, we decided to use something different from Bluetooth, since there are much more values (64 compared to 4,800). We have selected Wi-Fi as communication protocol, using Raspberry Pi as an access point. This way we could avoid the necessity of having a common router, so we can use our system anywhere (only a power source is required). We used this manual to configure Raspberry Pi as an access point: https://thepi.io/how-to-use-your-raspberry-pi-as-a-wireless-access-point/. Additionally, we configured Raspberry Pi in such way that any connected client can access Internet (given that RPi is connected to it via Ethernet).
After setting up RPi as an access point, every time one wants to access it, you just need to connect to it as to an ordinary Wi-Fi router. The password set was 1q2w3e4r5t
As RPi was a default gateway, its IP address in the network is 192.168.0.148. From there, you can access it using anything you want, e.g. ssh (ssh pi@192.168.0.148), which is necessary to start server application on the Raspberry Pi.
Useful links
2.4. Object detection on thermal images
It is a must to be able to detect people (or their faces) on thermal images from our sensor. I first started by reading general articles about thermal detection. The following article was a straight dive into thermal object detection using CNNs: https://medium.com/@joehoeller/object-detection-on-thermal-images-f9526237686a
OpenCV
However, the first approach was to use OpenCV. We used simple thresholding and contour detection, and then filtered detected contours by their area. This is fast, but is not accurate enough. Detailed implementations were "inspired" by this repository: https://github.com/KhaledSaleh/FLIR-human-detection
Convolutional neural networks
The next approach was to employ object detection using CNNs. One important criteria is that the model must be trained and converted to TensorFlow Lite (for edge devices). Luckily, we found a ready solution with pretrained models. This repository contains it: https://github.com/maxbbraun/thermal-face
The model was trained using Cloud AutoML on a mixture of three datasets: WIDER FACE dataset (simple images from visible spectrum), Tufts Face dataset and FLIR ADAS dataset (thermal images). More details are provided in the repository. The model weights are provided in the repository too.
To run inference on Raspberry Pi, we need to install TensorFlow Lite interpreter first (https://www.tensorflow.org/lite/guide/python). After that, we need Edge TPU Python API (https://coral.ai/docs/edgetpu/api-intro/#install-the-library-and-examples) to use convenient object detection modules, particularly DetectionEngine (documentation: https://coral.ai/docs/reference/edgetpu.detection.engine/).
More implementation details were taken from the same author but a different repository: https://github.com/maxbbraun/fever
Our object detection model locates faces and draws a bounding box. It also shows the temperature value (which is simply the largest value in a bounding box). The image is also displayed as a colormap, using Turbo colormap from Google researchers (https://ai.googleblog.com/2019/08/turbo-improved-rainbow-colormap-for.html).
Useful links
- FLIR Thermal Dataset for Algorithm Training - https://www.flir.com/oem/adas/adas-dataset-form/
- KAIST Multispectral Pedestrian Detection Benchmark - https://soonminhwang.github.io/rgbt-ped-detection/
- Analysis of thermal images - https://github.com/detecttechnologies/Thermal_Image_Analysis
2.5. Setting up HTTP server
After a bit of research, we found this article: https://damow.net/building-a-thermal-camera/
The author used the same sensor and even implemented a driver for Raspberry Pi, but later switched to ESP32 platform. He also implemented a web server which displayed video stream from the device. Inspired by this idea, we also decided to use HTTP server to stream video to any connected client. Additionally, it means that any device could receive stream using just HTTP, i.e. through web browser.
Since we are using Python, Flask web server was a candidate choice. It is simple, lightweight and can be integrated with our existing code. In order to get some instruction on how to use Flask to send video stream, the following resource was really helpful: https://blog.miguelgrinberg.com/post/video-streaming-with-flask/page/9
Our final application runs a web server in a separate thread, which takes data (which is set to a global variable) and sends it to clients as a stream of images.
2.6. Code archive
Useful links
Power consumption - https://raspi.tv/2019/how-much-power-does-the-pi4b-use-power-measurements
https://levelup.gitconnected.com/build-a-thermal-camera-with-raspberry-pi-and-go-8f70451ad6a0
https://makersportal.com/blog/2020/6/8/high-resolution-thermal-camera-with-raspberry-pi-and-mlx90640