Week 4. Mobile/Edge AI.
Train a computer with own data:
https://teachablemachine.withgoogle.com/
Code
tflocal-env
classify_cables.py
# Based on copyright 2019 Google LLC
# Modifications for custom TF model classification via OpenCV camera. By TBL, 2020
#/_________________________________________________________________
import argparse
import collections
import common
import cv2
import numpy as np
import os
import re
import tflite_runtime.interpreter as tflite
from tkinter import *
from PIL import ImageTk, Image
from collections import deque
import io
import operator
import time
#/_________________________________________________________________
# Function to start video: frame-by-frame capture & show classification
def show_frame():
    ret, frame = cap.read()
    # if read incorrectly
    if not ret:
        quit()

    ## each frame
    cv2_im = frame

    # in OpenCV the order of channels is BGR
    # in contrast for PIL library, whivh is RGB
    cv2_im_rgb = cv2.cvtColor(cv2_im, cv2.COLOR_BGR2RGB)
    # gets array, returns image object
    pil_im = Image.fromarray(cv2_im_rgb)

    # Tensorflow interpreter
    common.input_tensor(interpreter)[:,:] = pil_im.resize((common.input_image_size(interpreter)[0:2]), Image.NEAREST)
    interpreter.invoke()
    results = get_output(interpreter, top_k=3, score_threshold=0)

    # update image in GUI with a new frame
    imgtk = ImageTk.PhotoImage(image=pil_im)
    lmain.imgtk = imgtk
    lmain.configure(image=imgtk)

    res_text = ""
    # update classification results text in GUI
    for result in results:
        res_text += '\n{:.0f}% {}'.format(100*result[1], labels[result[0]])
        print(res_text)

    textVar.set(res_text)
    # 10 msec pause with next frame
    lmain.after(10, show_frame)

# Function to stop video
def stop_frame():
    cap.release()

# Function to get classification score
def get_output(interpreter, top_k, score_threshold):
    """Returns no more than top_k categories with score >= score_threshold."""
    scores = common.output_tensor(interpreter, 0)
    categories = [
        Category(i, scores[i])
        for i in np.argpartition(scores, -top_k)[-top_k:]
        if scores[i] >= score_threshold
    ]
    return sorted(categories, key=operator.itemgetter(1), reverse=True)

#/_________________________________________________________________
# Layout
window=Tk()
window.title('Cable classifier')
window.geometry("800x800+10+10")

# buttons
btn_start=Button(window, text="Start video", command=show_frame, fg='green')
btn_start.place(x=300, y=50)
btn_start=Button(window, text="Stop video", command=stop_frame, fg='red')
btn_start.place(x=450, y=50)

# results text
textVar = StringVar()
textVar.set("")
lblval=Label(window, textvariable=textVar, fg='black', font=("Helvetica", 20))
lblval.place(x=350, y=600)

# Image
lmain = Label(window)
lmain.place(x=80, y=120)

# declaring custom tflite model file and its labels
Category = collections.namedtuple('Category', ['id', 'score'])
default_model_dir = './CustomCableModel'
default_model = 'model_edgetpu.tflite'
default_labels = 'labels.txt'

parser = argparse.ArgumentParser()
parser.add_argument('--model', help='.tflite model path',
                    default=os.path.join(default_model_dir,default_model))
parser.add_argument('--labels', help='label file path',
                    default=os.path.join(default_model_dir, default_labels))
parser.add_argument('--camera_idx', type=int, help='Index of which video source to use. ', default = 0)
args = parser.parse_args()

# tensor allocations for TF interpreter
with open(args.labels, 'r') as f:
    pairs = (l.strip().split(maxsplit=1) for l in f.readlines())
    labels = dict((int(k), v) for k, v in pairs)

    interpreter = common.make_interpreter(args.model)
    interpreter.allocate_tensors()
#/_________________________________________________________________
# Main
cap = cv2.VideoCapture(args.camera_idx)
window.mainloop()
common.py
# Copyright 2019 Google LLC
#
# Licensed under the Apache License, Version 2.0 (the "License");
# you may not use this file except in compliance with the License.
# You may obtain a copy of the License at
#
#     https://www.apache.org/licenses/LICENSE-2.0
#
# Unless required by applicable law or agreed to in writing, software
# distributed under the License is distributed on an "AS IS" BASIS,
# WITHOUT WARRANTIES OR CONDITIONS OF ANY KIND, either express or implied.
# See the License for the specific language governing permissions and
# limitations under the License.

"""Common utilities."""
import numpy as np
import tflite_runtime.interpreter as tflite

EDGETPU_SHARED_LIB = 'libedgetpu.so.1'

def make_interpreter(model_file):
    model_file, *device = model_file.split('@')
    return tflite.Interpreter(
      model_path=model_file,
      experimental_delegates=[
          tflite.load_delegate(EDGETPU_SHARED_LIB,
                               {'device': device[0]} if device else {})
      ])

def input_image_size(interpreter):
    """Returns input image size as (width, height, channels) tuple."""
    _, height, width, channels = interpreter.get_input_details()[0]['shape']
    return width, height, channels

def input_tensor(interpreter):
    """Returns input tensor view as numpy array of shape (height, width, 3)."""
    tensor_index = interpreter.get_input_details()[0]['index']
    return interpreter.tensor(tensor_index)()[0]

def output_tensor(interpreter, i):
    """Returns dequantized output tensor if quantized before."""
    output_details = interpreter.get_output_details()[i]
    output_data = np.squeeze(interpreter.tensor(output_details['index'])())
    if 'quantization' not in output_details:
        return output_data
    scale, zero_point = output_details['quantization']
    if scale == 0:
        return output_data - zero_point
    return scale * (output_data - zero_point)
install_requirements.sh
#!/bin/bash
#
# Copyright 2019 Google LLC
#
# Licensed under the Apache License, Version 2.0 (the "License");
# you may not use this file except in compliance with the License.
# You may obtain a copy of the License at
#
#     https://www.apache.org/licenses/LICENSE-2.0
#
# Unless required by applicable law or agreed to in writing, software
# distributed under the License is distributed on an "AS IS" BASIS,
# WITHOUT WARRANTIES OR CONDITIONS OF ANY KIND, either express or implied.
# See the License for the specific language governing permissions and
# limitations under the License.

if grep -s -q "MX8MQ" /sys/firmware/devicetree/base/model; then
  MENDEL_VER="$(cat /etc/mendel_version)"
  if [[ "$MENDEL_VER" == "1.0" || "$MENDEL_VER" == "2.0" || "$MENDEL_VER" == "3.0" ]]; then
    echo "Your version of Mendel is not compatible with OpenCV."
    echo "You must upgrade to Mendel 4.0 or higher."
    exit 1
  fi
  sudo apt install python3-opencv
elif grep -s -q "Raspberry Pi" /sys/firmware/devicetree/base/model; then
  RASPBIAN=$(grep VERSION_ID /etc/os-release | sed 's/VERSION_ID="\([0-9]\+\)"/\1/')
  echo "Raspbian Version: $RASPBIAN"
  if [[ "$RASPBIAN" -ge "10" ]]; then
    # Lock to version due to bug: https://github.com/piwheels/packages/issues/59
    sudo pip3 install opencv-contrib-python==4.1.0.25
    sudo apt-get -y install libjasper1 libhdf5-1* libqtgui4 libatlas-base-dev libqt4-test
  else
    echo "For Raspbian versions older than Buster (10) you have to build OpenCV yourself"
    echo "or install the unofficial opencv-contrib-python package."
    exit 1
  fi
else
  sudo apt install python3-opencv
fi
CustomCableModel
Installing Tensorflow Lite into Raspberry Pi:
Overview of 5-step process:
- Update the Raspberry Pi
- Download this repository and create virtual environment
- Install TensorFlow and OpenCV
- Set up TensorFlow Lite detection model
- Run TensorFlow Lite model
Step 1a. Update the Raspberry Pi:
- Into terminal, copy the following:
sudo apt-get update
sudo apt-get dist-upgrade
Step 1b. Make sure you activate Camera Interface:
- Click the Pi icon in the top left corner of the screen, → "Preferences" → "Raspberry Pi Configuration" → "Camera Enabled" → click "OK"
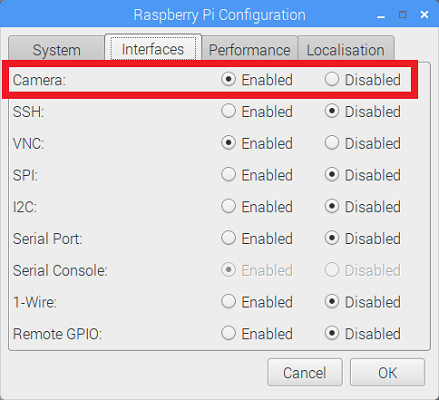
- Reboot system.
Step 2. Download this repository and create virtual environment:
- Clone the repository to your raspberry Pi
git clone https://github.com/EdjeElectronics/TensorFlow-Lite-Object-Detection-on-Android-and-Raspberry-Pi.git
- Go to the folder:
cd TensorFlow-Lite-Object-Detection-on-Android-and-Raspberry-Pi.git
- Install
virtualenvpackage:sudo pip3 install virtualenv
- Create Python3 new virtual environment:
python3 -m venv tflite1-env
- Activate virtual environment:
source tflite1-env/bin/activate
Step 3. Install TensorFlow Lite dependencies and OpenCV:
- Run following bash script:
bash get_pi_requirements.shtakes around 5 minutes..
Step 4. Set up TensorFlow Lite detection model:
- Download sample SSDLite-MobileNet-v2:
wget https://storage.googleapis.com/download.tensorflow.org/models/tflite/coco_ssd_mobilenet_v1_1.0_quant_2018_06_29.zip
- Unzip to a folder called "Sample_TFLite_model":
unzip coco_ssd_mobilenet_v1_1.0_quant_2018_06_29.zip -d Sample_TFLite_model
Step 5. Run the TensorFlow Lite model:
- Execute the following bash script:
python3 TFLite_detection_webcam.py --modeldir=Sample_TFLite_model
Using Edge TPU Object Detection Models with Coral USB Accelerator:
Overview of 5-step process:
- Activate virtual environment
- Add Coral package to distribution list
- Install libedgetpu library
- Set up Google's EdgeTPU model
- Connect Coral USB Accelerator
- Run detection with EdgeTPU
Step 0. Coral USB Accelerator is disconnected.
Step 1. Activate existing virtual environment:
cd TensorFlow-Lite-Object-Detection-on-Android-and-Raspberry-Pi
source tflite1-env/bin/activate
Step 2. Add the Coral package repository to your apt-get distribution list:
echo "deb https://packages.cloud.google.com/apt coral-edgetpu-stable main" | sudo tee /etc/apt/sources.list.d/coral-edgetpu.list
curl https://packages.cloud.google.com/apt/doc/apt-key.gpg | sudo apt-key add -
sudo apt-get update
Step 3. Install the libedgetpu library:
sudo apt-get install libedgetpu1-stdStep 4. Set up Google's sample EdgeTPU model:
wget https://dl.google.com/coral/canned_models/mobilenet_ssd_v2_coco_quant_postprocess_edgetpu.tflite
mv mobilenet_ssd_v2_coco_quant_postprocess_edgetpu.tflite Sample_TFLite_model/edgetpu.tflite
Step 5. Connect USB Accelerator to Raspberry Pi.
Step 6. Run detection with Edge TPU:
python3 TFLite_detection_webcam.py --modeldir=Sample_TFLite_model --edgetpu