Fragments
Overview
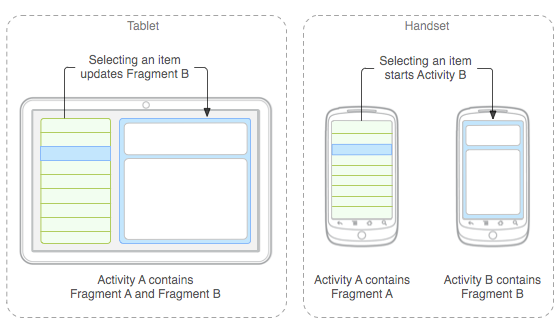
A Fragment represents a behavior or a portion of user interface in a FragmentActivity. You can combine multiple fragments in a single activity to build a multi-pane UI and reuse a fragment in multiple activities. You can think of a fragment as a modular section of an activity, which has its own lifecycle, receives its own input events, and which you can add or remove while the activity is running (sort of like a "sub activity" that you can reuse in different activities).
To create a fragment, you must create a subclass of Fragment (or an existing subclass of it). The Fragment class has code that looks a lot like an Activity.
Methods
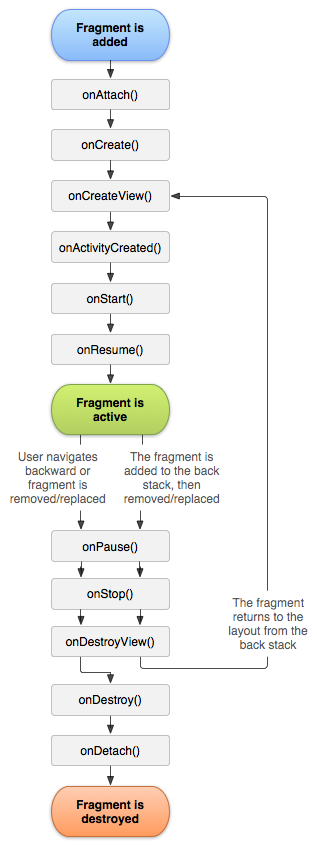
Usually, you should implement at least the following lifecycle methods:
The system calls this when creating the fragment. Within your implementation, you should initialize essential components of the fragment that you want to retain when the fragment is paused or stopped, then resumed.
The system calls this when it's time for the fragment to draw its user interface for the first time. To draw a UI for your fragment, you must return a View from this method that is the root of your fragment's layout. You can return null if the fragment does not provide a UI.
The system calls this method as the first indication that the user is leaving the fragment (though it doesn't always mean the fragment is being destroyed). This is usually where you should commit any changes that should be persisted beyond the current user session (because the user might not come back).
Example
Step 1. Create a Fragment Class
To create a fragment, extend the Fragment class, then override key lifecycle methods to insert your app logic, similar to the way you would with an Activity class.
One difference when creating a Fragment is that you must use the onCreateView() callback to define the layout. In fact, this is the only callback you need in order to get a fragment running. For example, here's a simple fragment that specifies its own layout:
import android.os.Bundle;
import android.support.v4.app.Fragment;
import android.view.LayoutInflater;
import android.view.ViewGroup;

public class ArticleFragment extends Fragment {
    @Override
    public View onCreateView(LayoutInflater inflater, ViewGroup container,
        Bundle savedInstanceState) {
        // Inflate the layout for this fragment
        return inflater.inflate(R.layout.article_view, container, false);
    }
}
Step 2. Add a Fragment to an Activity using XML
While fragments are reusable, modular UI components, each instance of a Fragment class must be associated with a parent FragmentActivity. You can achieve this association by defining each fragment within your activity layout XML file.
Here is an example layout file that adds two fragments to an activity when the device screen is considered "large" (specified by the large qualifier in the directory name).
res/layout-large/news_articles.xml
<LinearLayout xmlns:android="http://schemas.android.com/apk/res/android"
    android:orientation="horizontal"
    android:layout_width="fill_parent"
    android:layout_height="fill_parent">

    <fragment android:name="com.example.android.fragments.HeadlinesFragment"
              android:id="@+id/headlines_fragment"
              android:layout_weight="1"
              android:layout_width="0dp"
              android:layout_height="match_parent" />

    <fragment android:name="com.example.android.fragments.ArticleFragment"
              android:id="@+id/article_fragment"
              android:layout_weight="2"
              android:layout_width="0dp"
              android:layout_height="match_parent" />

</LinearLayout>
Step 3. Then apply the layout to your activity:
import android.os.Bundle;
import android.support.v4.app.FragmentActivity;

public class MainActivity extends FragmentActivity {
    @Override
    public void onCreate(Bundle savedInstanceState) {
        super.onCreate(savedInstanceState);
        setContentView(R.layout.news_articles);
    }
}